photo gift card holder | fun teacher appreciation idea
These adorable photo gift carte holders are an piece of cake, practical gift teachers are sure to love!
Yesterday a friend of mine asked this question on Facebook: "teachers, what gift do you beloved to receive at instructor appreciation time?" Nearly everyone said the same verbal affair: teachers would love a note from the child and if a souvenir is involved, a gift bill of fare is the best option. Many mentioned that they plough around and use the gift cards for their grade. And so I figured instead of trying to think up a cute gift this year, I'd just give teachers what they want. In a beautiful mode, of form.

I took pictures of my kids, and then used Adobe Photoshop Elements to size them then the piece of newspaper they are belongings is the same size as a souvenir card (I'll prove y'all how later in the postal service).

Then I used an exacto knife the cut around the fingers, and slid a gift card in betwixt the hands so information technology looks like the child in the motion-picture show is belongings the gift card. They turned out so cute!

I adhered the photo on the right side of a carte and had my kids write a note to their teacher on the left.

VIDEO
They tin't wait to give their cards to their teachers! Hither'southward a quick video showing how easy it is to make the gift carte holders:
Instructions
So let's get to the how-to, shall we? This is really quite elementary, I only want to share a few details.
First, grab a standard 8.5×11 canvas of paper, and trim one.five inches from a long side and then information technology is at present vii×11. Accept a moving picture of your kid holding the paper in front of them, like the i yous see beneath. Have him hold the paper fairly shut to his breast, and not too far away from his chin. Make certain his fingers are visible in front of the paper on both sides.

Adjacent nosotros want to get the photo merely the right size to hold a souvenir card when it's printed as a 4×six photo. The easiest mode to do this is using Adobe Photoshop Elements.
I utilize Photoshop Elements so often that I've teamed upwards to be a make ambassador for them, which means every few weeks I'll be bringing you lot a new tutorial using Photoshop Elements. I love the fact that Photoshop Elements is incredibly powerful, merely still easy to use. Thanks to Adobe for sponsoring this post.
How to resize a photo in Adobe Photoshop Elements to employ equally a gift card holder
(Quick note: I like to use Floating Documents mode in Photoshop Elements, which means you can meet and work on more than one document at a time. To plow this on, go to Preferences -> General and click "Allow Floating Documents in Expert Mode".)
1. Start past opening your photo in the photo editor of Adobe Photoshop Elements. As well open a new blank file that is four inches wide, 6 inches loftier, and 300 pixels/inch.

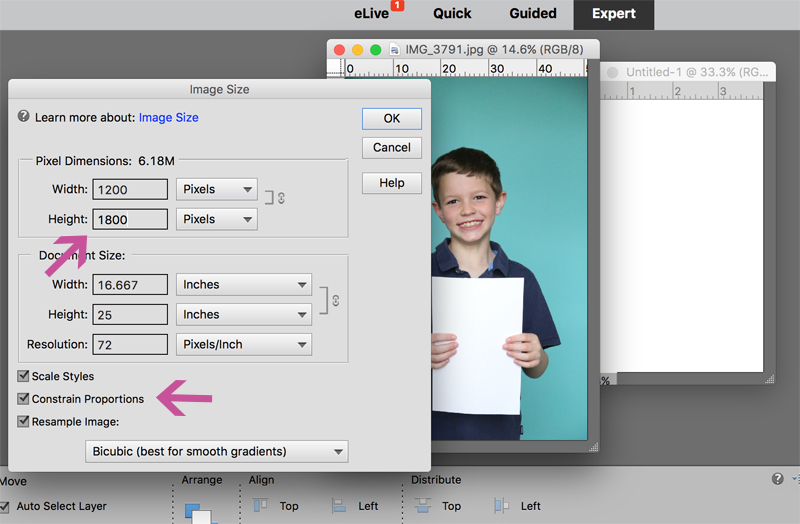
two. Click on your photo to select information technology. In the summit toolbar, go to Paradigm –> Resize –> Epitome Size. Y'all'll see a window similar the one below. Make sure "Constrain Proportions" is checked. Change the Pixel Dimensions Summit to 1800, and hitting ok.
3. Drag the photo onto the new blank file and close the original photo.
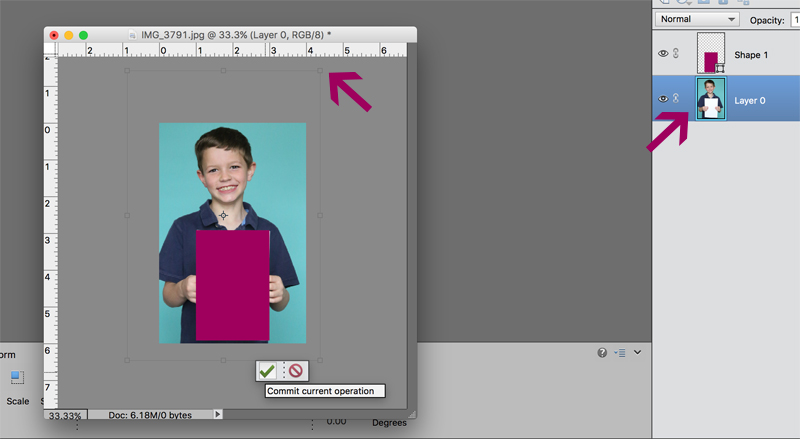
4. Hit "U" or click on the rectangle shape tool from the toolbar. In the menu at the lesser, choose "stock-still size" and ready the size to ii inches wide and 3 inches loftier (if you plan to print your photo out at home). If you plan to impress your photograph through a photograph lab, ready the size to 1.85 inches broad and two.85 inches high. Click on your photograph to draw a rectangle.

5. Choose the photo layer by clicking on the photo in the layers palette to the right. Take hold of 1 corner of your photo and pull outward to enlarge the photo. Make the photo big enough that the slice of paper the child is property is the same size as the rectangle you just drew (as shown below). This will ensure that when y'all print out the photo information technology will be the right size to concord a gift card.
six. Hide the rectangle layer past clicking on the center icon adjacent to it in the layers palette. Click on the photo layer and move it around if needed to centre your child in the frame. Then y'all tin flatten your photograph and impress information technology out on card stock at dwelling, or save it as a .jpg and club it as a 4×6 print from a photograph processor.

Now your photo is ready to be turned into a gift carte holder!

It's an piece of cake, practical instructor appreciation or end of year teacher souvenir idea that any instructor is certain to love!
Reader Interactions
vitaglianothall1989.blogspot.com
Source: https://www.itsalwaysautumn.com/photo-gift-card-holder-fun-teacher-appreciation-idea.html
0 Response to "photo gift card holder | fun teacher appreciation idea"
Post a Comment